
Chandeliers are more than just your typical light fixture.
They are a true centerpiece of a room, a light feature rather than just a functional light provider.
So it can be nice to control your chandeliers with a remote control to set the perfect atmosphere for your evening while you’re multitasking – whether preparing a dinner party or just setting up movie night.
Can remote control options be added to your chandelier, though?
You can control a chandelier remotely, either with a wireless light switch or a dedicated radio remote. You’ll need to install a radio control unit in the light fixture for both options. A more expensive option, but with more control, is using smart bulbs.
In this guide, I’ll explain the following:
- The different ways to control your chandelier remotely
- How to mount a wireless switch
How To Make A Chandelier Remote Controlled?

There are three main ways to make your chandelier controllable by remote. However, only one of those typically comes with an actual remote control – though with the third option, you can set up a remote if you want to.
Remote Control Unit
If you want an actual remote control for your chandelier, you’ll need to buy a remote control unit (Amazon).
These are typically universal because the actual light fixture itself is irrelevant – it can work with a chandelier, a pendant, or a recessed light – provided you check the rated voltage and wattage.
These remotes are typically basic on/off, which means they’re often relatively small – some are designed to fit on a keychain.
This works because they use a radio frequency receiver which you need to install in the light fixture itself.
The remote then communicates with the receiver, acting as a light switch. It will allow the power to run through to the light, or it’ll cut it off.
The idea is to leave the main light switch always in the ‘on’ position and then control it using the remote instead.
If you leave the main light switch off at any point, the remote won’t work.
These are not the easiest to find because more RF receivers for lights tend to be designed for low-voltage lights.
If you want one for your chandelier you need to make sure it is a 120-volt receiver (or 240 volts if you’re in Europe).
Don’t install a 12-36V receiver, or it’ll be a fire hazard.
The range is good, though – often up to 100 meters, and because of its radio frequency, it can pass through walls.
So these remotes can be used from other rooms to set the right lighting level, which is handy if you’re in the kitchen and about to serve food in the room with the chandelier.
Remote Control Light Switches
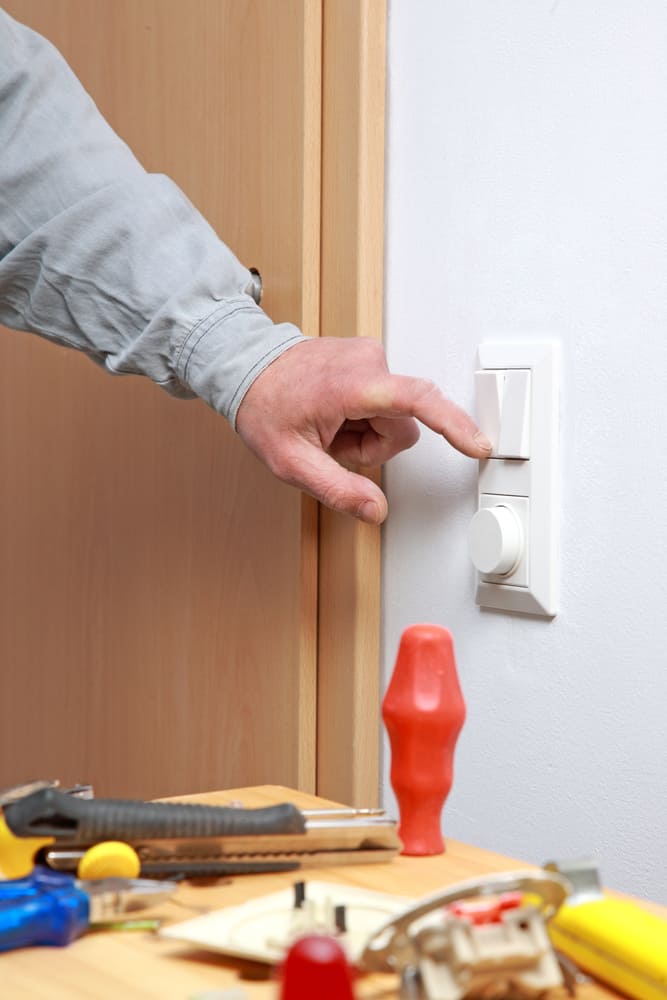
Wireless light switches (Amazon) work in exactly the same way as a remote control unit, except that instead of a remote control, you get a light switch instead.
This means they’re not quite as useful because wireless light switches aren’t designed to be carried around.
They’re designed to be wall-mounted instead of a traditional light switch.
However, they are much more common than remote control units for chandeliers and other lights. Therefore, finding one to buy is much easier.
The process is still the same – you wire the receiver into the light fixture, and the switch will work.
The light switch doesn’t need to be wired into the mains, nor does it need batteries.
They’re really clever – they convert the kinetic energy of your clicking the light switch into the tiny amount of power needed to send the radio signal to the receiver.
Some remotes may work the same, though others may require a battery.
A wireless light switch can therefore be mounted anywhere in the room.
While it’s not quite as portable as a remote control, you can still have a lot of flexibility in making it conveniently accessible.
You will notice the most significant benefit if your room wall decor has any historical value.
You won’t need any work to run the wire to a switch, which could have damaged it.
Install Smart LED Bulbs
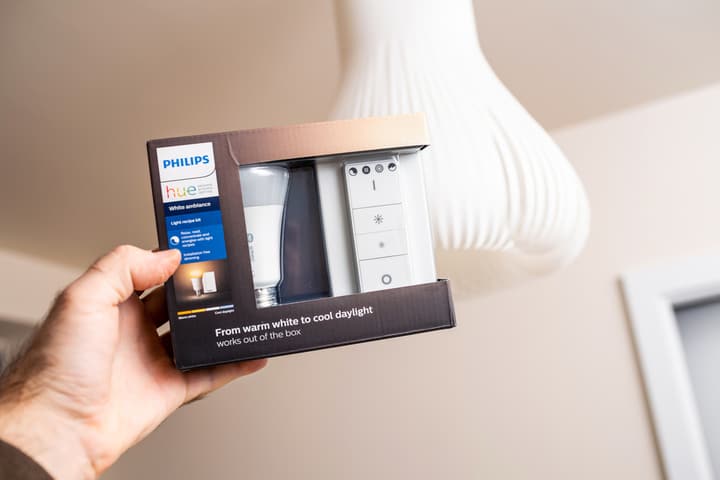
The easiest option for remotely controlling your chandelier is to use smart light bulbs.
These don’t need you to remove the chandelier fitting to install a receiver and instead can work with just the bulb installed.
However, you’ll likely want to add a bridge too, which is a small device that gives you more options for controlling your lights, including grouping them together.
Otherwise, you can’t control ‘the chandelier’ from your phone, but you can control each chandelier bulb one at a time.
Adding a bridge means you can group the lights in the app and control them all at once. In addition, it’s easy to install a bridge since they plug into the mains and your wireless router.
Smart bulbs aren’t just the easiest option, they also offer the most customization.
You can control them from your phone, quickly dim them, set timers, and control them away from home as well – you’ve all kinds of options available.
You can buy a dedicated smart remote (Amazon) if you do prefer to use a remote control instead of your phone.
The downside to smart bulbs? The cost.
They are significantly more expensive since each bulb will likely cost more than a remote control unit or a wireless light switch with the receiver.
For larger chandeliers, those costs can quickly rocket, especially when you need to pay for a bridge.
How To Mount A Wireless Remote Light Switch?
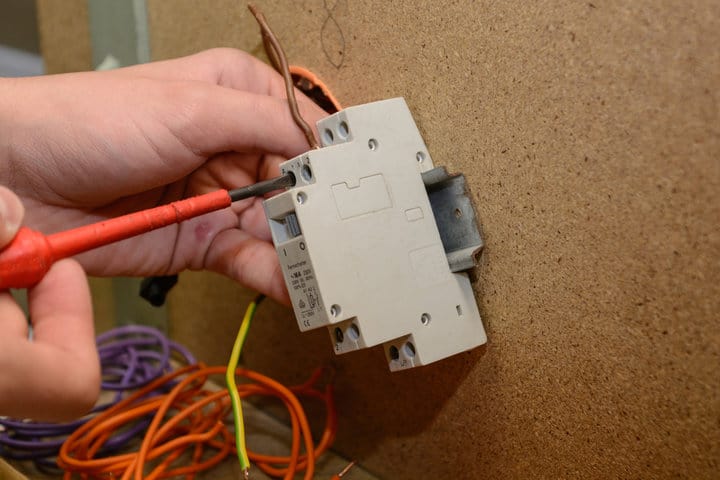
If you install a wireless remote light switch or a remote control unit, here’s what you need to do.
- Switch off the power at the mains
- Remove your chandelier so that you can access the junction box above it
- Disconnect the wiring from the chandelier, and connect the mains power to the live wire of the RF receiver, and the neutral wire on the receiver to the neutral wire from the mains
- Connect the live load wire of the RF receiver to the chandelier’s live wire and the neutral load wire to the neutral wire on the chandelier
- Place the receiver safely inside the junction box, and then re-install your chandelier
That’s the difficult part done.
Removing a chandelier is not easy, and you might need help, especially for larger chandeliers, so check my guide on removing a chandelier before you do this.
Then, to mount a wireless light switch:
- Find the spot where you want to install the light switch. It can be anywhere but avoid locations where pipes or wires run close to the wall. It’s unlikely to be an issue since you will be using small screws
- Screw the base unit for the switch into place using one screw, and then check it is level with a spirit level
- If it is, add the remaining screws to hold it in place
- If your light switch has a clip-on cover, clip it into place. If it needs screwing into place, hold the cover over and screw it on.
Final Words
Chandeliers, and indeed any light fixture, can be controlled remotely without a huge amount of hassle.
The biggest problem for chandeliers will be installing the wireless receiver since they are often complex and heavy fixtures, and removing them from the ceiling can be challenging.
If you have the budget, you may prefer smart lights, especially with the extra customization options.
But for most people, follow the steps to carefully remove a chandelier. Then either a remote control or a wireless switch will be all you need.
Have you converted your chandelier into a wireless one yet? Have you gone for the RF option or smart bulbs?
Looking for an LED bulb but not sure what type you need?
Check out my free bulb picker and select the right bulb within few clicks.