Whether you’re an experienced electrician or someone experimenting with circuits for the first time, you must make sure every component is wired together correctly.
And if you’re new to circuitry, then I know it can sometimes be confusing how those parts are properly put together.
If you’re using LEDs, then you might be unsure of which way to wire it up. Does it matter which way the LED is connected in the same way that it does when you’re installing a battery?
In short, yes, LED bulbs have polarity. They are made with a positive and negative connection. They should be wired into your circuit in the correct direction, or they won’t work.
There’s a lot of conflicting information out there on the internet around LEDs, including on polarity and whether it matters. So in this article, I’m going to tell you:
- Whether polarity really matters with LEDs
- How to identify the positive and negative legs of an LED
- What will happen if you don’t wire an LED correctly
By the end of this article, you will be confident in the best way to connect an LED – but let me know in the comments if you still have questions.
Is Polarity Important For LEDs?
By definition, a diode is an electrical component that only works when a current passes through it in one direction.
An LED is a Light Emitting Diode, and so it works exactly the same as any other diode. It will only do its job – in this case, ’emitting light’ – if it is wired correctly.
LEDs have an anode and a cathode. These are the LED legs, and they need to be connected to the circuit correctly. The anode is the positive connection, and the cathode is the negative one.
Your power source will have a polarity. You should make sure that the anode is properly connected to the circuit’s positive flow, with the cathode then sending the current through the negative direction.
Your LED will only work correctly if you make sure you pay attention to polarity!
How To Identify The Positive And Negative Leg Of LED?
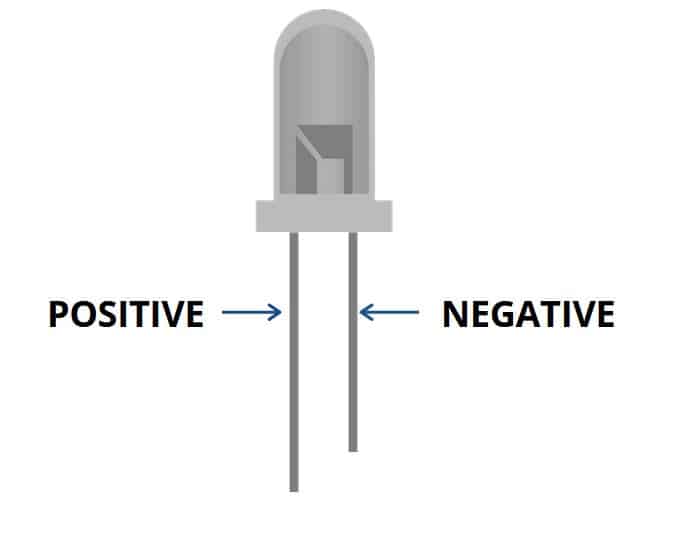
The easiest way to identify an LED’s polarity is to look at the length of the legs. You should notice that they are slightly different.
That isn’t a fault; that is how they are designed – the longer leg is positive, while the shorter leg is negative.
But what do you do if the bulb isn’t brand new, and the legs have been cut or soldered to fit an installation?
Don’t worry, as there are other ways to check.
Firstly, look at the LED itself. You should notice that one side of the bulb is flat, while the other is rounded. The flat side is closest to the negative leg, while the positive is closest to the rounded edge.
If that doesn’t help, look into the LED. If you can see the plates inside the LED, you should recognize that one of them is larger. The larger plate is negative while, the thinner plate is the positive side.
If you still can’t tell which one, and you don’t want to wire it into your circuit, you can just grab a battery. Connect one leg to the positive side of the battery and one to the negative. If the LED lights up, you know you’ve got it right. If not, reverse the LED and try again.
The best way to do this is to use a coin cell battery (Amazon). These are smaller and less powerful, which means there is no chance of you damaging the bulb, and you can simply hold it against the legs.
You could use a bigger AA or AAA battery, but you would need to wire it up.
Even better than a battery would be a multimeter. They are designed for this job, so testing it is as simple as turning the device onto the diode setting and then touching the positive and negative pins to the legs of the LED to see if it lights up.
You should be fine checking the LED for the length of the legs or the flat edge, but these other options mean you’ll always be able to work it out one way or another. You should have no problems identifying the positive and negative legs of an LED in the future.
What Happens If You Wire LED Lights Backwards?
If you wire an LED into a circuit backward, with the anode and cathode backward, then nothing will happen.
By that, I mean two things. One, the light won’t work. But two, it won’t be damaged either.
At least, that is true in most cases where the circuit has low to normal voltage. If you were to connect an LED to a high voltage circuit and have it wired incorrectly, it might damage the LED and prevent it from working.
You can’t always see this with your own eye. You might just reverse the LED and find that it still doesn’t work, which is when you know it is broken. Sometimes you can see physical damage if the bulb has burned or overheated.
These instances are both unusual, and most of the time, I can reassure you that your circuit won’t be so overpowered. Don’t panic if you do accidentally connect an LED with the polarity reversed. Just change it, and it should work.
Some choose to include a reverse diode in their circuits. This is designed to protect any LEDs or other diodes and allow reverse current to flow through it if something goes wrong. You may not need to add a reverse diode, but depending on your work, it might be a useful option.
Final Words
You shouldn’t guess when you are installing an LED in an electrical circuit. I know that sometimes you might want to work quickly, but it is important to make sure everything is properly connected.
But as I have made clear, it’s not too difficult to identify the correct polarity, with many options available.
Most people can tell straight away from the legs, but there are a few options to choose from when that isn’t clear.
Which method do you use to check the polarity of an LED? Have you ever seen a badly burned-out LED because of poor circuitry?
Let me know in the comments below.
Looking for an LED bulb but not sure what type you need?
Check out my free bulb picker and select the right bulb within few clicks.


