Cables, cables everywhere!
Yes, this is pretty much a definition of the modern world. But does it have to be that way?
Well, it probably does in the IT industry.
Luckily, we are not talking about IT but lightning, and although the wiring is required, it’s far less complicated.
Wiring a downlight fixture to a light switch is not as hard as it may sound. Three different cables live, ground, and neutral need to be connected to a marked terminal. Tripping the fuse in the main fuse box is essential to maintain safety.
Now, let’s explain everything in more detail.
What Does a Switch Do?
In its most basic form, the switch is an electrical component that can switch appliances on and off by connecting or disconnecting the conducting path, interrupting the flow of electric current.
Switches are of many forms and functionalities ranging from the simple mechanical toggle ON/OFF or rotary switches to more modern dimmer switches.
The latter is better for you when installing lighting in new builds or modernizing the current homes.
The main difference between conventional and dimmer switches is that the dimmer switch gives you control over the amount of light in a room.
Whilst conventional switch only allows for 0% or 100% of the light (ON/OFF) dimmer switch can do 0%, 100%, and anything in between to set the lighting to fit your mood.
What Wires Does Light Switch Have?
Three wires are used in most cases to provide the electrical connection.
Wires are color-coded to ensure the switch can be wired safely and without the need to measure the electrical potential difference between live (hot), neutral (return), and ground (also known as earth) wires.
These are the three cables that, in most cases, connect to a light switch and come in brown (formerly red), blue, and green/yellow sleeves, respectively.
In some cases, the neutral wire can also be any other color except green (green can only be the ground wire). The live wire can be red, and in old houses or high voltage applications, the ground wire can be bare copper.
Two vs Three Way Switch Difference
People often confuse the difference between having three wires instead of only having two wires that connect to a switch.
As I mentioned earlier, there are three wires (hot, neutral, ground).
The only difference between 2-way and 3-way switches is that a 2-way switch does not have a terminal for the common cable.
The common cable passes the information to the first switch whether the light is on or off so the second switch can turn it off or on accordingly.
The ultimate difference is that a two-way switch can turn light on or off from only one location. In contrast, a 3-way switch can turn light on or off from two different locations (i.e., top and bottom of the staircase).
A rare application is a 4-way switch, which you probably guessed can turn the light on or off from 3 or more different locations. So depending on the application, one type is superior to the other.
Dimmer Switch Wiring
If you are thinking about remodeling a home, one thing to consider is whether to install conventional or dimmer switches.
Ultimately both types will ensure the proper amount of light in the room. Still, the latter has some benefits over the conventional switch.
Surprisingly a switch with a dimmer is no different than a standard switch.
The wiring is identical. The dimmer mechanism is implemented into the switch itself, meaning there is no extra wiring required.
As a result wiring downlights for a dimmer switch will be exactly the same.
Dimmer switches are contemporary, often work better than conventional switches, and are versatile to your needs.
Some of the reasons why I prefer the installation of dimmers to conventional switches are:
Cost
You can control the amount of light that is emitted from the light bulb. This is proportional to the amount of energy the light bulb needs.
Depending on the light setting using the dimmer switch, you can save up to 10% on your energy bill, depending on how often you use the dimmer switch and set it.
Durability
Because dimmer switches ease the voltage going through the light bulb, it adds extra lifespan to the light bulbs.
It is estimated that light bulbs that are dimmed by 25% (emitting 75% of their maximum) can last longer.
This is due to the light bulbs being under less stress and emitting less heat, meaning they will not burn out as quickly as if conventional switches were used.
Extra control
You can ultimately control the amount of light in every room. By using the dimmer switch technology, all your lightning is under control by a simple turn of a knob or slide of a switch.
A remote control that can be used with smart dimmers is a convenient technology that will stop your family fights about who should go switch the lights.
What Happens If Switch Is Wired Incorrectly?
The worst-case scenario is connecting the live wire to the ground screw.
Consequently, the ground wire is then also connected to the wrong terminal, and the switch is not correctly grounded. In such a case, you expose yourself to serious danger from shock.
Accidentally crossing the wires would result in a short-circuit, which would pop the fuse in the main fuse-box.
Reversing the wires, i.e., accidentally swapping the live and neutral cables in a light switch reverses the on/off switch mechanism.
Meaning where you had position “on” previous, will now be “off” and vice versa. However, reversing the wires could be dangerous and could result in shock, short circuit, or worst-case scenario fire.
Wiring a 3-way switch is ultimately trickier than wiring a 2-way switch mainly due to these common problems:
- The common wire must be connected to the common screw otherwise the lights will not work from more than one switch
- The additional wiring involved makes the manipulation with all the wires in the switch box harder and more complex. Some electricians recommend installing a larger switch box instead of the existing one to accommodate the additional wiring.
Before any DIY electrical project, always makes sure it will not result in home insurance being void if not carried out by a qualified electrician.
How To Wire Downlights To A Switch?
Before you wire a downlight to a switch, you have to check the wires, how they are marked, and what terminals they go into.
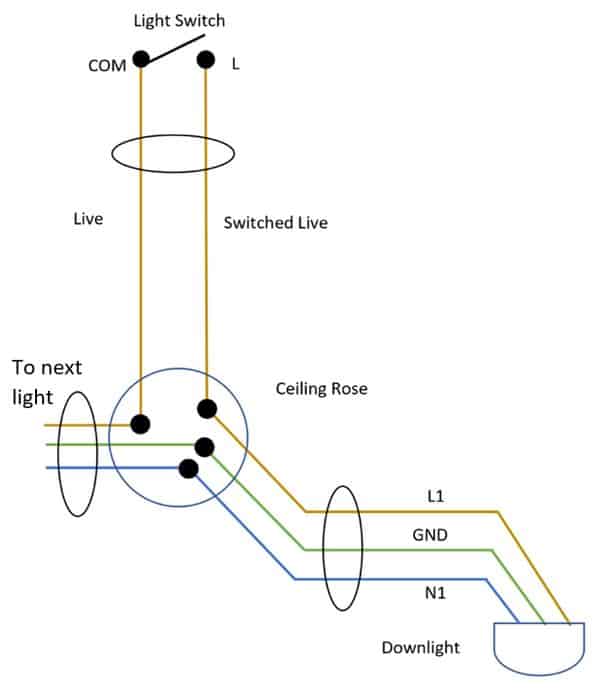
I have created a simple one-way switch wiring diagram for a downlight.
Brown wires represent the live and switched live wires, blue wire represents the neutral wire and ground (earth) is represented by green wire.
Since downlights can be connected to the same switch as conventional lights, you won’t need to take the light switch apart. So the main difficulty lies in wiring the downlight to the ceiling rose.
No matter how many downlights are mounted to one fixture, there is one common connector to which the wires connect. As shown in the diagram above, L1, GND, N1 correspond to the same marking on the downlight terminals.
These could be L1 for live (brown) wire, GND for ground (green) wire, and N1 for blue (neutral) wire, but always check the manual as colors might slightly vary.
Here is a great video explaining the topic more in-depth.
Final Words
If you were unsure of how to wire downlights, you should be all set now.
Downlights can be a real treat to any home. You can benefit from their energy-saving capabilities as well as extra control over the amount of light in a room if you decide for a dimmer switch.
Although the wiring can be pretty daunting, the installation is as simple as the diagram suggests.
One final remark is to keep the fuse in the junction box is tripped before the installation, so you have all the safety measures in place.
Also, make sure to read all the enclosed manuals.


