
Whether you’re revitalizing your entire home or you just want to update your lighting, there may be times when you need to remove your old recessed lights.
It’s relatively easy, provided you know how the recessed lights are put together. It doesn’t have to be a huge project if you’re upgrading your lights to LEDs.
To remove a recessed light, you just need to remove the cover, then the bulb, and then unclip the trim holding it in place. The can should then be free to pull down, giving you access to the junction box where you can disconnect the wiring and remove the whole fixture.
There’s sometimes a little more to it, so let’s explore it in more detail:
- Whether LED bulbs are compatible with incandescent recessed fixtures
- How to remove old incandescent recessed lighting
- How to change an LED bulb in a recessed light that has a cover
- How to convert can lights to flush mounted LEDs
Are Incandescent Recessed Lights Compatible With LED?
In the same way that you can replace an incandescent light bulb in a pendant fixture with an LED with no problems, recessed lights can also take LED bulbs easily.
As long as you make sure you buy a bulb that has the same bulb base, then it will work perfectly fine in a recessed light fixture.
Some older recessed light fixtures are mirrored. That’s because incandescent bulbs tend to shine their light in all directions.
It’s not worth wasting that light energy by illuminating the recessed hole, so the mirrors on the inside of the fixture helps to direct all of the light into the room.
LED bulbs, on the other hand, tend to be more directional. That’s a problem in car headlights, because the light can be reflected in a blinding way.
But in a recessed home light, it’s not an issue – the direction of the bulb is downwards anyway.
So, you can just swap an LED bulb into an incandescent fixture with no problems.
How Do I Remove Old Incandescent Recessed Ceiling Light?
Here’s how to remove recessed ceiling light, step-by-step:
Start by turning off the power.
When you completely remove the ceiling light, you will leave behind exposed wires, which you don’t want to live on.
- Remove any cover on the light – it should just pull off, but check in case it is clipped in place and needs the clips to be pressed in first.
- Unscrew the bulb inside the fixture, and set it to one side.
- Remove the trim which holds the can in place.
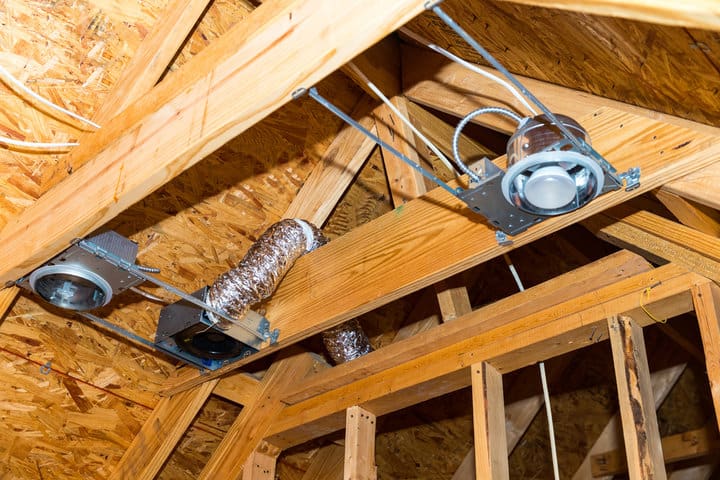
- Pull the can down through the hole, pulling through the junction box with it.
- Open the junction box and disconnect the wires.
- Once that’s done, the can should be completely free to be removed.
One thing to bear in mind is whether the ceiling is insulated.
If it is, then you’re going to be disturbing that insulation when you remove the lights.
Because the insulation is made from fiberglass, it’s an irritant, and you don’t want it to come into contact with your skin.
Nor do you want to breathe any fibers in.
So make sure your arms are fully covered, and you’re wearing a mask when removing recessed lights from an insulated ceiling.
How Do I Remove Old Recessed Lighting Trim?

Older recessed lights are made from a couple of different parts, one of which is the trim.
The trim sits flush against the ceiling and then goes inside the can, helping to hold the can in place.
The trim itself is usually held in place with a clip, so once you’ve removed the bulb, reach inside the fixture to push in the clips.
Usually, there are two or three.
Once they’re pushed in, you should be able to remove the trim by sliding it down.
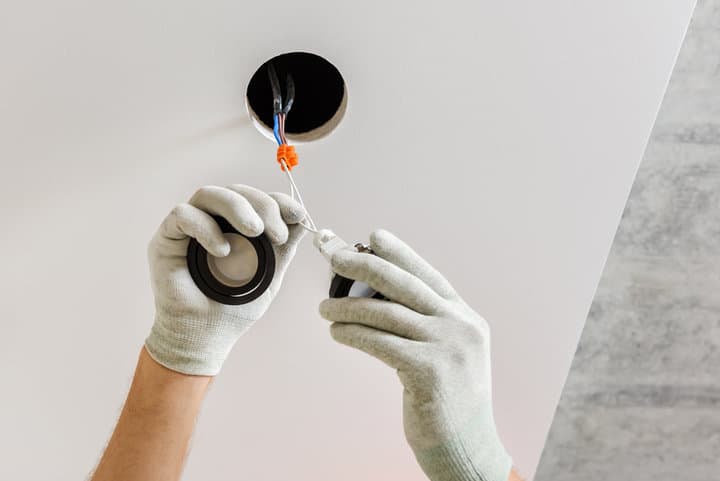
How To Change An LED Bulb In Recessed Ceiling Light With A Cover?
Some recessed ceiling lights have a cover that goes over the entire bulb; when the bulb dies, you’ll need to remove this before you can access the bulb.
However, it’s an exceptionally easy process, as the covers are often just clipped into place and can be pulled free.
It’s best to start by slightly pulling down on the cover and then checking the exposed lip for any catches or clasps.
You might need to push on a release lever if you can feel one.
If you can’t, give the cover a solid pull, and it should come away.
Once the cover is gone, it should be as simple as unscrewing the light bulb, replacing it, and then pushing the cover back into place.
It’s worth noting here that not all LED recessed lights have bulbs you can access.
Some are integrated, which means that instead of a traditional bulb, they just use light-emitting diodes within the fixture itself.
Often these fixtures are flat, disc shapes.
If the light burns out on one of these, you’ll need to replace the entire fixture.
Thankfully it’s made very simple since these lights are plugged into a driver using a single cable.
You just pull the light down, unplug the cable, plug the new one in and push it into place.
Converting Old Recessed Lights With Flush Mount LEDs

Flush mount LEDs are another option for replacing your old recessed lights.
These aren’t recessed – instead, they are large, slim domes that sit flush against the ceiling.
Standard sizes for flush-mount LEDs range from 12 to 24 inches, but it’s not so much the size of the light you need to be concerned with and more the mount itself.
Flush mount lights attach to a bracket that you install first, which is normally much smaller than the light itself.
For a 12-inch flush-mount light, it will likely be 6 inches.
Many recessed can lights are 6 inches, so you may need to patch the hole before installing the bracket.
It will depend on the bracket size for your new light. Also, you don’t want to install the screws on the edge of a pre-existing hole – the drywall may crumble.
But, if the bracket is at least 2 inches bigger than the hole, the ceiling should support it.
Remove the can light fixture as explained above, leaving the wires dangling through the hole.
Attach the bracket to the ceiling, leaving the screws low. Then, wire the light with wires previously connected to the recessed light.
If your old recessed light had an integrated junction box, it’s best practice to add your own junction box here and keep the wire connections contained inside it.
Once the light is wired up, put it in place, covering the hole the recessed light left, twisting it into position, and tightening the screws.
Add the cover to the light, and you’re done.
One thing to remember is that flush mount lights are at least twice the size of recessed lights. So you may only want one or maybe two in a room.
If you’re replacing multiple recessed lights, you’ll want to cap off the wires left behind by the ones you’re outright removing and then patch the ceiling holes where you aren’t adding the new lights.
And if your old recessed lights weren’t central, but your new flush mount light will be, then you’ll need to patch all the holes, cut a new one for the wires to run through, and run the wire to the new fixture.
Final Words
Removing recessed lights permanently or replacing them with newer versions is not very challenging.
The biggest issue will always be patching the ceiling if you remove them for good.
That’s why, if you want to keep the DIY to a minimum, you should shop around and make sure you measure for replacements that are the same size as the old ones.
Have you removed old canned lighting, and did you encounter any issues not covered here?
Looking for an LED bulb but not sure what type you need?
Check out my free bulb picker and select the right bulb within few clicks.