LED strip lights are one of the most flexible ways that you can light up your home. And I’m not making a joke about how the strips literally are flexible – I mean that they give you so many options that you can use them to create your dream living space, no matter what that looks like.
Because LED strip lights can be attached to a wide range of surfaces, cut short or extended, and fitted to unusual shapes, you can use them to brightly light a room or add an accent to a stairway or alcove to immerse yourself in movie night or to add a touch of color to your garden at night.
As great as they are, there’s a lot you need to know when you’re first buying LED strip lights. So, I’ve created this ultimate guide to give you everything you could need. I’m going to tell you:
- What kinds of LED strip lights you can buy
- How bright they need to be
- The different ways an LED strip can be powered
- How to install your LED strip lights
Table of Contents
Different Types Of LED Strips
When we talk about LED strip lights, there isn’t just one kind that you need to go and pick up for the cheapest price available. There are several types, and you need the right one for the job at hand.
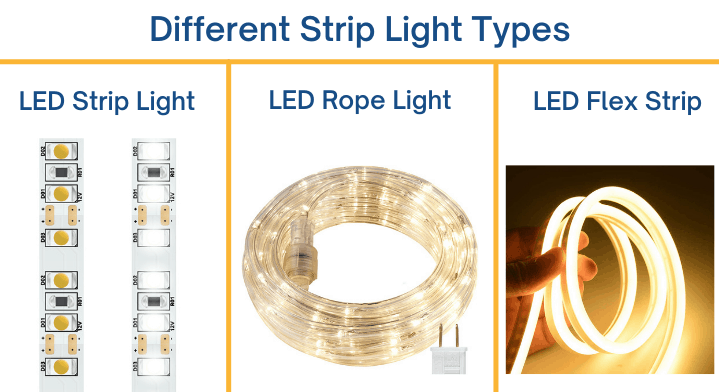
Strip vs Rope vs Flex Strip Light
When we talk about standard LED light strips, we mean one designed with one side adhesive that can be stuck to a surface and the other side where the actual technical components sit, including the LEDs, diodes, etc.
They’re not particularly pretty to look at when they’re switched off, but I’ll get to that later. They’re designed to be placed on a flat surface, although that surface can bend and contour – as long as the strip has something flat to stick to.
Ideally, a standard strip is used where it’s not going to be visible during the day when you don’t have the lights switched on. They’re great for coving, alcoves, under-cabinet lighting, or behind your TV.
Rope lights are a bit different. They’re not adhesive and are fully encased in a rope that’s great for wrapping around furniture, tying up in a tree, or simply hanging on a wall or amongst your hedgerows.
They’re not well suited to subtle spaces since they can be a little cumbersome – these are lights you want to show off.
As a sort of middle ground, you have flex strip lights.
These are closer to a standard strip light in that they’re more designed to be stuck down as an accent rather than a focal point, but they’re fully enclosed with the LEDs not visible – you instead get one combined light source.
If you’ve a space where you want to use strip lights, but they’ll be visible when switched off, a flex strip is the best option.
White Vs RGB Strip Lights
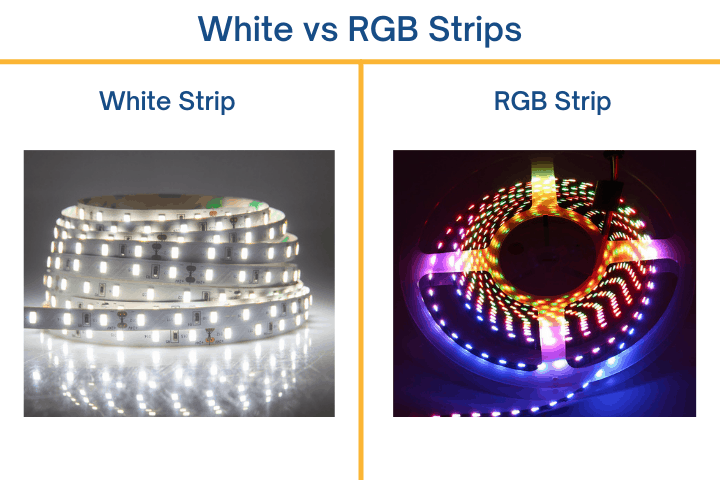
Once you’ve worked out which type of strip lights you need, you next need to think about colors. Generally, you’re going to be choosing between white or RGB.
White LED strip lights are exactly that – ‘plain’ white lights. Except there are a few different options of white available, depending on whether you want a warm white for a cozy space or a cool white that’s better served to a place where you’ll be working – whether that’s the kitchen or a garage with a tool bench.
When buying a white LED strip, look for the Kelvin (K) rating. This measures how warm or cool the white light is – the higher the number, the cooler and closer to almost blue.
The lower it is, the warmer and closer to orange. Warm white LED strips will be rated around 3000K usually, while cool white strips are normally 6000K.
It’s worth noting that just because you’ve bought two light strips rated the same Kelvins, they might end up not looking the same.
They should do, but because light strips differ in quality, a badly-made strip might not be accurate to the rating it advertises, and over time is more likely to get worse too.
The alternative is to choose an RGB LED strip using LEDs with three light chips – red, green, and blue.
By combining these colors at different brightness levels, an LED strip can recreate around 16.7 million different shades.
That’s more than the human eye can actually tell the difference between – so you’ve essentially every option you could want.
However, the combination of red, green, and blue isn’t as pure a white – so if you want white light, you’re better getting a dedicated white strip instead of RGB.
What RGB light strips give you is a lot more customization for your home. You can set the mood for a romantic evening or choose a color designed to help you feel more alert when you’re studying.
Also, you can use them to as supporting light for growing plants as they emit the required color spectrum.
Some smart light strips can also sync with your TV and change color to match what’s on-screen – perfect for getting more immersed in movie nights.
Consider whether you’re more interested in an authentic warm or cool white color, or you want the option to change to a more colorful shade. This will help you to decide between white and RGB light strips.
With so many options in mind, you might wonder if strip lights are safe for your pets.
Also read: Do LED Strips Attract Spiders?
Except for exposed cables that your dog can chew, strip lights are safe for them.
The Brightness Of The LED Strips

It’s no good buying cheap LED light strips that aren’t very bright – by the time you’ve installed them, you’ll just be left disappointed by the faint glow that doesn’t properly do your space justice.
The exact same applies if you buy good quality LEDs that aren’t meant to be super-bright, particularly if you then install your strip lights in a place that’s sheltered, such as around coving or underneath a cabinet.
Light strips look amazing when they’re tucked out of the way, providing they’re bright enough to still have an impact – so make sure you’re shopping for the suitable brightness of light strip depending on where you intend to place the light strips.
Light bulb brightness is measured in standalone lumens that don’t tend to work for light strips because they are smaller and spread out. The individual lumens of a single bulb is irrelevant because it’s the strip’s combined light that determines the brightness.
But you can’t give the total lumens for the entire strip – that doesn’t make sense. If a strip is 5 meters long, then a bulb at one end isn’t going to impact the surrounding area at the other end of the strip.
So, the standard measurement for light strips is either lumens per meter or lumens per foot. A high-quality light should provide around 1500 lumens per meter or 450 lumens per foot.
If you buy LED light strips with a lower lumen output, then the light may not be bright enough for your needs.
Why Is Density And Size Of The Of Diodes Important?
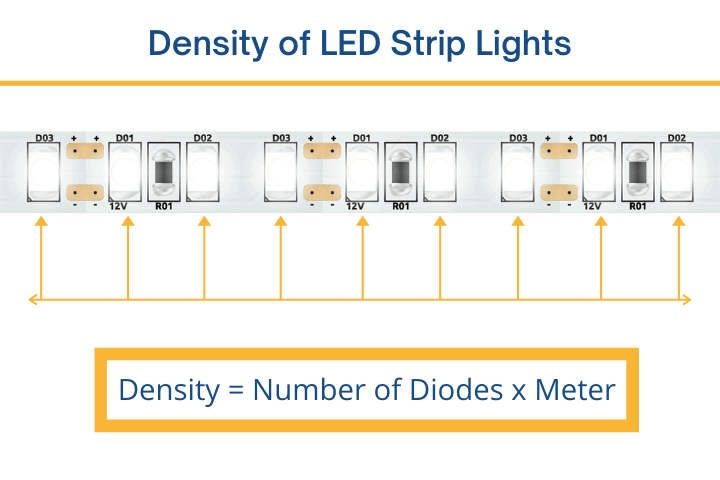
The density of the diodes impacts the brightness of the LED strip. Not every LED strip has the same number of bulbs.
The higher the LED density, the brighter the light generally. The light is also more uniform with a higher bulb density.
If you buy a standard density light strip, it will typically have 30 bulbs per meter.
Higher density strips will have 60 or 120 bulbs per meter, although you can get even higher – up to 350 LEDs per meter.
A lower density may mean that the light is spotted – stronger next to each bulb but with dim interludes. More bulbs mean a more consistent light.
That’s not the only consideration, though – the chips’ size plays its part in brightness and uniformity.
You’ll notice that LED strips are advertised with a four-digit code. The most common are 3528, 5050, and 2835.
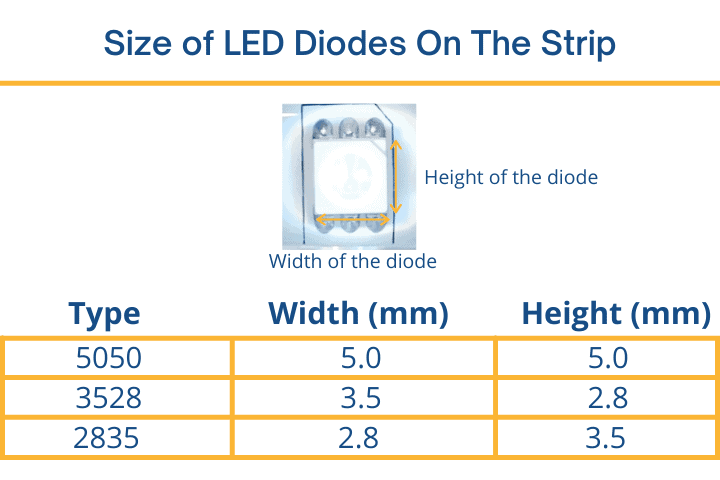
These numbers actually describe the size of the chips. 3528 strips have chips that are 3.5mm wide by 2.8mm tall, while on 2835 strips, those measurements are reversed.
5050 strips have chips that are 5mm (5.0) by 5mm.
3528 light strips are less power-intensive than 5050 strips but also not as bright. A 3528 strip with a higher density than 5050 can be a similar brightness, though.
5050 light strips contain three diodes per chip and tend to be the choice when you want RGB lighting.
2835 light strips are newer than 3528 and are more efficient too. There are several reasons.
While the dimensions are the same (just rotated) in terms of width and height, the LEDs on a 2835 strip are thinner – around 0.6mm to 0.8mm than the 1.9mm diodes of the 3528.
This doesn’t impact brightness or energy use so much, but it does mean the whole light strip has a lesser volume.
What does impact brightness is the diode’s size, and the rotated orientation of the 2835 strips means that it can fit in larger diodes that are generally brighter.
The 3528 chips tend to have a flux of 6 to 9 lumens. At the same time, 2835 are anything from 11 to 60 – a considerable increase (in brightness but also power consumption).
So they’re more efficient in terms of brightness when you buy one with a higher power draw, but you can get equivalent strips in terms of power, at around 0.1W per chip, which will give you 7-9 lumens on a 3528 and 10-12 on 2835.
Here 2835 is also more efficient due to the built-in heat sink, which directs more heat away from the diodes to maintain a higher power and brightness and be more stable.
Finally, there’s a difference in the shape of the light-emitting surface of the chips on each strip. On a 3528, the light-emitting area is circular, which is inefficient.
The newer chips on 2835 emit light from almost the entire surface – which equates to around twice the size of the area on the 3528. So 2835 strips are brighter and have more even illumination.
Bear in mind that all of the above also generally makes them more expensive.
Also, remember that the higher a density light strip you choose also impacts the power required.
One 60w power supply might be able to power just one high-density strip, but it could be enough for twice the length of a low-density strip.
So, let’s talk about making sure you choose the right power source for your chosen LED strip lights.
How To Select The Right Power Source For LED Light Strips?
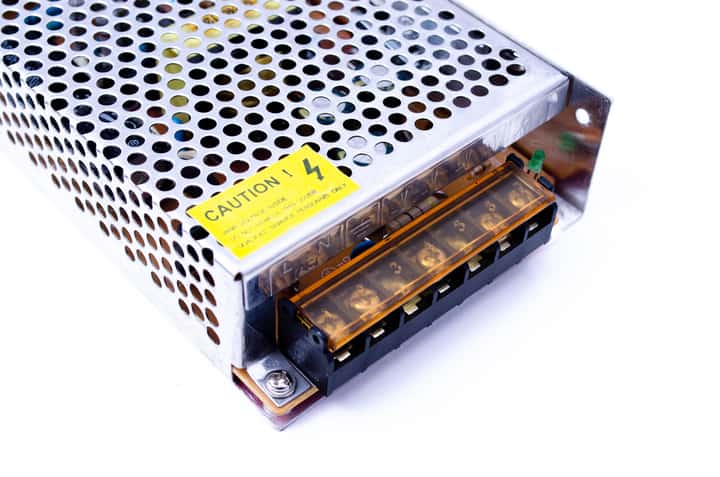
There are two things to consider when choosing your power source for your LED strip lights.
Firstly, you need to make sure you get the correct voltage to match.
LED strip lights are either 12V or 24V. They’re designed for different purposes – if you’re more likely to run lights in a straight distance, then 24V are better because they won’t experience as much of a voltage drop over distance.
However, 12V strips are suitable if you intend to cut your strips around corners or wrap them around an angled surface – they have more cut points (usually twice as many).
If you buy the wrong type of power supply for your light strip, then you’ll either underpower or overpower your LED strip. A 12V power supply isn’t sufficient for a 24V strip. A 24V power supply is dangerous when paired with a 12V strip.
Underpowering a 24V strip simply means it won’t turn on. Overpowering a 12V strip could cause the LEDs to go smoking hot and potentially set on fire.
Make sure you buy the matching type.
Then, you need to check the consumption of your LED strip lights. You’ll either get the total wattage consumed, or the wattage per meter, or both shown on the packaging or website.
You then need a power supply that provides at least that amount of power for the length of LED strip you want to use, plus an extra 20%. That’ll mean you’ve no chance of overloading it.
For example, say you buy a 5-meter strip reel, but you only intend to use 2 meters. The LED strip is rated at 4.8W/m or Watts per meter, which means that the total power draw of two meters of the strip is around 10 Watts.
As long as your power supply provides 20% more than this (so 12W or above), you’ll be fine. Almost any will – 12 Watts is meager. 36W power supplies are standard.
If you then added a connector and another few meters of the light strip, you’d need to check whether the power supply was still sufficient or if you needed to upgrade it.
Also feel free to use my calculator that shows you exactly how many strips you can connect to your existing PSU.
How To Connect Light Strips To The Power Source?
Essentially, there are three different connector types that you’ll find on your LED strip lights when it’s time to connect them to the power source. Then, there are two different connectors on the power supply side.
So, depending on the LED strip connector and the power supply connector, there are six possible combinations of connections to think about. None of them are particularly complicated, but you may need an additional component.
If your LED strip lights have a DC receptacle and your power supply has a DC plug connector, you just need to plug them together.
When the power supply has open wires, you’ll need a male DC adapter – insert the wires and screw or clip them in place, then plug the adapter into the receptacle on your strip lights.
Or should the LED strip lights have open wires or a solderless connector, then you’ll need a female DC adapter to connect it to a DC plug – again, just feed the wires into place and clip or screw them down.
For an open wire to open wire connection, you’ll need the female and the male DC connectors.
When the LED strip has copper pads, you’ll need a solderless connector to attach to the pads, which will let you then plug it into a female DC adapter, which can, in turn, connect to the DC plug.
Or if it’s copper pads connecting to open wires, you can simply solder them together.
Related: Can LED Strip Lights Be Battery Powered?
How To Install LED Tape Lights: Step By Step
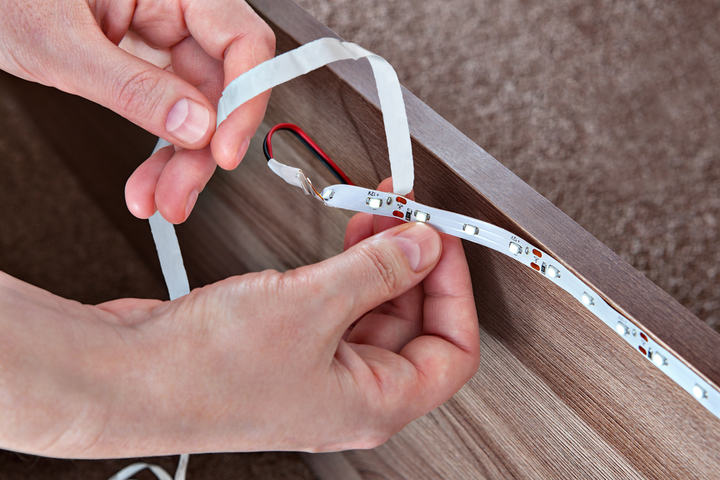
You now have all the knowledge you need to install your LED strip, so here are the steps you need to follow to stick your strip lights.
Step 1 – Measure – always do this first! No guessing here. Use a tape measure to see just how long a strip you need.
Step 2 – Your LED strip will probably be on a reel, so unwind the length you need. It’s normally easiest to trim at this step, rather than once you’ve tried to start installing it, so unfurl the length needed and trim along a cutting line.
Step 3 – Clean and thoroughly dry the area where the light strip is installed. Don’t take a shortcut by skipping this step.
There must be no dust that could impact the heat dissipation, and an unclean or damp surface won’t effectively hold the adhesive strip.
Step 4 – Remove the adhesive backing from one end of the LED strip, and press it firmly into place. It’s crucial that for longer lengths, you don’t remove the entire adhesive strip at once.
It’ll be unwieldy and could stick to you or the wrong wall. Instead, peel a section back, press it into place, then move along to the next section. Be careful to avoid any kinks or air bubbles as you go.
If your LED light strips don’t have an adhesive backing, simply purchase double-sided tape that’s designed to be used with strip lights. Apply the tape to the surface first, and then add the lights.
Step 5 – Once the entire strip has been firmly stuck into position and you’re happy with it, connect the strip to the power supply, ensure you follow the steps above, and switch it on. It should now be ready to operate.
Step 6 – If your LED strip is operated by remote, check that the various settings are working. Or, if it’s compatible with a smartphone app, download the app now and pair it with the light to make sure you’re able to change the colors and switch it on or off successfully.
How Many LED Light Strips Will I Need For My Room?
LED light strips are available to buy in different lengths.
So, how many you need for your room purely depends on the area you want to cover and then the length of strip you wish to buy based on your choices for type and brightness.
Because LED strip lights have so many uses, you’ll need to measure yourself to work out what you need.
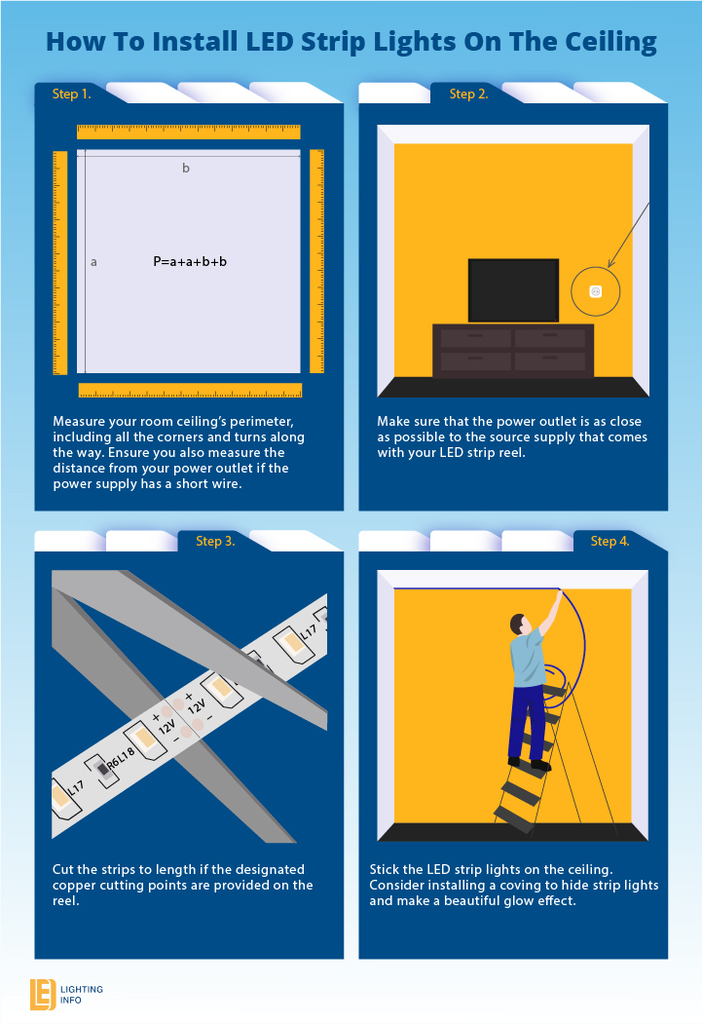
As an example, here’s what to do if you want to use LED strip lights around the perimeter of your ceiling.
The simple formula you need is P=2(a+b), where P is the perimeter, and a and b are the length and width of your room. Measure the length once and the width, add them together, then double it to give you the total perimeter.
This only works on evenly square or rectangular rooms – if your room has alcoves or is L-shaped, you’ll just have to measure each side individually and total them up.
Once you’ve done this, you’ll know how long the strip lights need to be. Alternatively feel free to use my calculator below.
Things To Keep In Mind When Installing LED Strip Lights
There are a few things to keep in mind when you’re installing your LED strip lights. Firstly, make sure that you consider the outlet location for plugging in your strip lights.
Suppose you’ve done all the thinking about which power supply you need. In that case, you should also think about how to actually connect that power without cables spoiling the neat look of your lights.
Aim to keep the end of your lights as close to the outlet as possible. It’ll make hiding the power cable easier.
Next, look at the surface that you’re installing your lights on. If you want to install it directly onto wood, you’ll need a heatsink for safety reasons.
Also, are the walls smooth and easy enough to install a strip on, or are they textured or bumped, which may mean you struggle to get them to stick?
You may need an alternative location.
You might also have issues in future if you add LED strip lights to bare drywall, or wallpaper or paint.
The adhesive these strip lights use is strong – you don’t want them falling down – but this could mean in the future that you damage the wall or tear off the wallpaper when you remove them.
You need to consider this before you install.
Air circulation is important too – it’ll also act as a way of dissipating the heat that your strip light generates.
I get it.
You want your strip lights to last long before you need to replace them. Good airflow is vital for keeping temperatures low and letting the LEDs work their best for their intended lifespan.
If the room has poor circulation, how can you improve that before you add your lights?
Finally, the quality of your LED strip lights is critical. If you buy cheap to save money, you’re opening yourself up to many potential issues.
Poorly made lights may be the wrong color – more of a yellow than a pure white. They might burn out faster, meaning you need to go to all the effort of replacing them sooner.
Most urgently, they might have poor heat dissipation and just be dangerous to use.
Always buy quality LED strip lights from a manufacturer you recognize.
Unfortunately, the market is flooded with cheap imports, which can look very tempting, but be wary of fake reviews and just buy from a manufacturer or retailer you know you can trust.
My personal preference goes to Philips LEDs. I use their standard LEDs as well as LED strip lights, and never had an issue.
Also read: Are LED Strip Lights Allowed in Dorms?
Is It Safe To Cut The LED Strip Light?
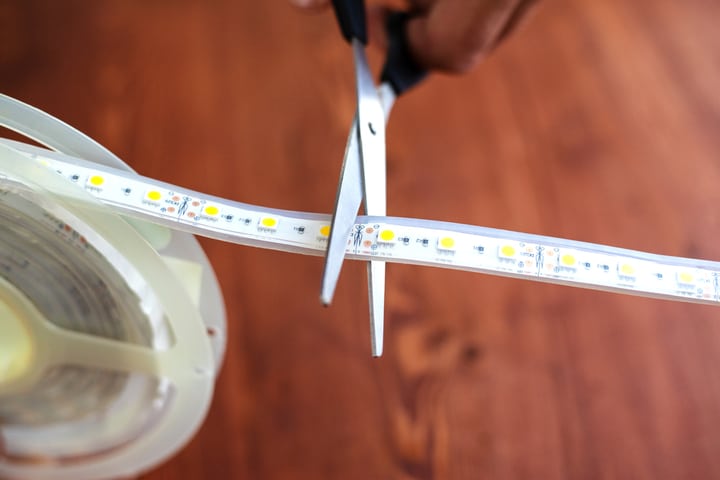
Because LED strip lights are designed to be flexible and placed where you need them, you must get the right size for your room. With that in mind, strips can be cut to fit the space.
You can’t just cut a strip light anywhere, though. Many people don’t realize what they’re doing with strip lights and will damage an entire reel.
Basically, each set of LED strips is made up of a series of connected circuits. As long as you trim the lights in between these sets of circuits, you won’t break one, and both sides will continue to work when connected to a power supply.
So how do you cut an LED strip light safely?
It’s easy – look for the cutting lines.
The strip will have a series of solid lines along the entire width the strip. Cut here, carefully and straight with a sharp knife or scissors, and you’ll be fine.
Depending on the type of LED strip light you buy, those cutting lines may be closer together or more spread out.
They’re normally every three LEDs or so, but a 12V strip will have more cutting points, usually double that of a 24V strip.
For this reason, 24V strips are better for longer straight lines, but if you have a lot of corners consider 12V strips with multiple power sources.
Connecting Multiple Strip Lights
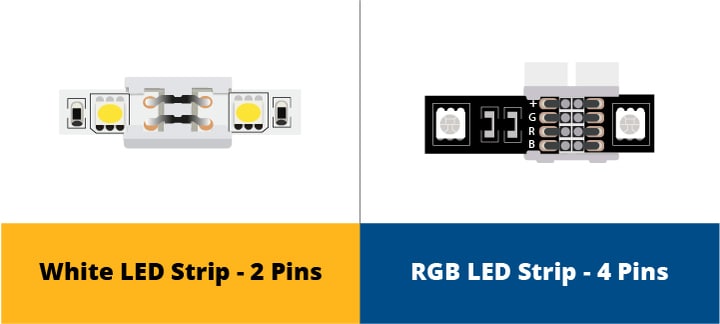
Connecting strip lights together is relatively straightforward once you know what you’re doing.
The easiest way to do it is with a connector, which can be straight, a 90-degree angle or a t-tap.
They’re affordable and straightforward – you just need to strip away the plastic cover over the copper pads.
Then insert the strip ends into the connector, making sure you line up the polarity. Add the second strip to the other side, and you should be good to go.
You can instead directly solder it yourself if you don’t want to use a connector. Strip back the wires on the connecting light strips and twist any frayed ends together.
Then, melt the solder directly onto the copper pads of the LED tape lights you’re connecting to. Attach the wires to the solder puddles (black to negative, red to positive), and you’re set.
There are two main things to consider when connecting multiple strip lights.
Firstly, you need sufficient power. Connecting too many strip lights in a line can be too much for the power supply – the latter strips won’t be as bright because of the voltage drop.
The 12V LED strips shouldn’t exceed around 10 feet, while 24V can manage a bit further, up to about 15 feet.
If you need more than this in a series, you need to look at a secondary power source. Or, you could connect them in parallel. A parallel circuit would mean that, instead of chaining the LED strips together, each one is connected directly to the power supply. So you won’t get the same voltage drop by having the current run through one light strip before another.
The drawback to wiring in parallel is that most power supplies are designed with one positive and negative output, so you’re going to need to do a bit of wiring work to split this. You can buy wire splitter terminals for this purpose.
The other thing to look out for is making sure you don’t mix and match 12V and 24V LED strip lights.
If you connect a 24V strip light to an existing 12V powered one, the 12V won’t switch on.
Do it the other way around – adding a 12V to an existing 24V power supply – and you’ll overpower the 12V strip; they’ll get extremely hot to the point of smoking and could set on fire quickly.
Simply – don’t mix and match 12V and 24V strips.
Can LED Strip Lights Work 24/7?
LED lights, in general, produce a low amount of heat.
That’s not to say LEDs don’t give off any heat – you should make sure your strips have a heat sink installed to take the residual heat away from the bulbs.
But to the touch or on your surfaces, the heat levels are very low.
With that in mind, and because they’re low voltage – so there’s no risk of them causing a power surge if they break – it’s safe to leave LED strip lights on 24/7 if you want to, just make sure you’ve bought good quality lights.
However, it is better to switch them off when they’re not used to protect your power source and more importantly protect your sleep.
The transformer will get hot, and over time this will damage it. Switch it off when you’re not in use to protect your power supply for longer.
Buying poor quality lights is a lot riskier – they’re more likely to overheat due to being overvolted or because they aren’t sufficiently cooled.
These could be dangerous, which is why it’s always better to spend a little more and get safe lights from a reputable manufacturer.
FAQ

Do LED Strip Lights Require Aluminum Heat Sinks?
LED strip lights need a heat sink to remove the lights’ heat and dissipate it into the air. If you don’t have a heatsink, your LED strip lighting will overheat and quickly start to drop in performance.
They won’t get hot to the touch necessarily, but the extra heat will have nowhere to go and will impact the diodes.
Heat sinks don’t need to be made from aluminum, but it’s the best performance/cost compromise.
Copper is technically more conductive, and so does a better job of removing heat, but it’s extremely expensive. Thermoplastics are cheaper but nowhere near as good for a light strip. Aluminum provides the best balance.
Are LED Strip Lights Waterproof?
Some LED strip lights are waterproof and can be used outside, but not all.
If you’re planning on installing your strip lights in a bathroom or outdoors, you need to look for a waterproof set to ensure that they aren’t damaged by splashes or rainfall.
Waterproof LED strip lights will be rated IP65 – check the website or box when you buy.
If you can’t see any mention of an IP rating, assume they aren’t waterproof and choose another option.
Are LED Strip Lights Easy To Remove?
Strips use a strong adhesive backing to make sure they stay in place.
It’s not particularly difficult to remove LED strip lights but do it carelessly, and you could damage the wall where they were affixed.
Always peel away LED strip lights gently, starting at a corner and using a flat tool (even a credit card will do well) to ease the adhesive strip off the wall.
It’s a good idea to use a hairdryer to help soften the adhesive. It’s also a terrible idea to do so for more than a couple of minutes, or you’ll significantly shorten the lifespan of the LEDs, due to the heat it generates.
Are LED Strip Lights Dimmable?
All LED light strips are dimmable – if you have the correct power supply. The actual LED strip can be dimmed, but the transformer in the power supply unit needs to be compatible with a dimmer.
If it isn’t, then you’ll damage the power supply, and your lights may not work properly.
Final Words
That covers the key information you need when choosing LED strip lights for your home or workplace.
It’s not too scary once you know what you’re looking for – just choose the type of strip for your home, make sure you select the right brightness and get a power supply that’s capable of managing the total strip length you need.
Follow these steps when searching for your LED strip lights and use the guide above on how to install them.
Very soon, you’ll have added amazing lighting to your home that’ll look modern, stylish, and cozy too.
Let me know in the comments whether there’s anything else you want to know about LED light strips.
It’d also be great to hear from you if you’ve installed your own LED strip lights – let me know how great they look!

