
How To Install A Pond UV Light?
After 9,000–12,000 hours, a UV bulb can still glow while delivering almost no algae-killing dose — meaning a unit that looks fine may have quietly stopped working months ago.
 Eugen
EugenEugen Nikolajev
Creator of LED Lighting Info
Hi, I am Eugen. I was always one of those kids who had all sorts of weird lighting gadgets for every occasion.
Now, I want to share my knowledge and experience about lighting with you on LED Lighting Info.
Read my editorial standards
Key Takeaways
A pond UV light must be installed in a dry location. Most units are weatherproof but can't be flooded, the best location is secured on top of a filter or attached to a post near the pond. They work best when placed after the main mechanical filter, where the unit is less likely to be damaged and can clarify already-debris-free water.
Murky pond water is almost always caused by an algae bloom, and a UV clarifier or sterilizer is the most effective way to fix it. The question is how to install one correctly so it actually does its job.
This guide covers in-line (external) UV clarifiers and sterilizers, which are by far the most common type. If you have a fully submersible UV unit (e.g., Pondmaster's submersible line, or an all-in-one filter/pump/UV combo), follow the manufacturer's instructions for in-pond placement instead.
In this guide, I'll cover:
- How to set up your UV light in the pond
- What size UV light you need
- Where to locate your UV pond light
How To Set Up A UV Light In The Pond
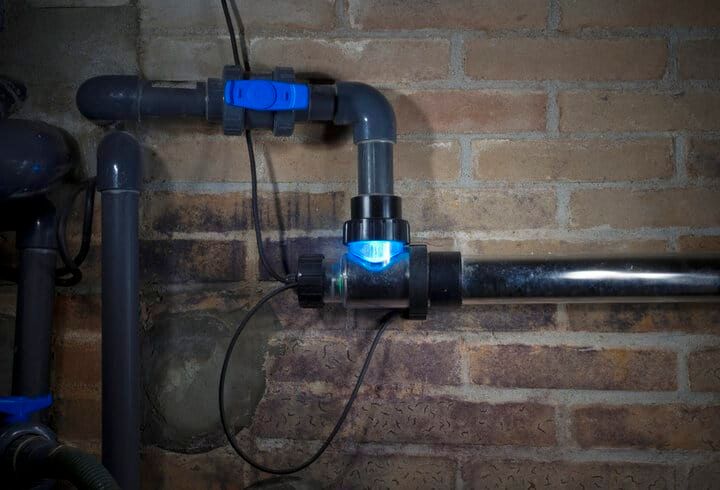
An in-line UV unit has an inlet, an outlet, and a lamp chamber at one end where the bulb screws or slides into place. It needs mains power via a standard plug.
Here's the install sequence:
- Switch off and unplug your existing pump system.
- Run a pipe or hose from the mechanical filter outlet to the inlet valve on the UV light, using the included plastic nuts to secure it.
- Run a pipe or hose from the UV outlet back to the pond — either straight in or via a water feature such as a fountain.
- Install the bulb into the lamp chamber (sometimes called the lamp cap) on the UV unit. Some units use a threaded fitting, others a push-and-twist — check your manufacturer's instructions. Always handle the bulb and the clear quartz sleeve around it with clean gloves or a cloth, never bare hands.
- Plug the UV light into a GFCI-protected outdoor outlet. A Ground Fault Circuit Interrupter is required by electrical code for any outdoor water-feature wiring and is non-negotiable for safety.
Once everything is connected, power on the UV light to confirm it's working. There's usually a small indicator window where you can see a faint blue glow.
Don't look directly into it — a glance from an angle is enough to confirm operation.
If the lamp is lit, switch the pump and filter system back on and check the connections for leaks.
Key safety tips:
- Never look directly at a lit UV bulb. UV-C exposure damages eyes and skin.
- Never handle the UV bulb or its quartz sleeve with bare hands, even when the unit is off. Skin oils heat up on the quartz surface (which operates at 600–850°C in use) and cause permanent etching — known as devitrification — that reduces UV output and creates hot spots that shorten bulb life. The outer plastic housing is fine to touch; it's specifically the bulb and the clear quartz sleeve that need clean gloves or a clean cloth.
- The bulb is fragile. Don't force it if it won't slot in — back off and check the orientation.
What Size UV Light Do I Need?
Sizing depends on your pond volume and whether you want to clarify (control green-water algae) or sterilize (kill pathogens and parasites). The two jobs use the same hardware category but require very different UV doses.
Here's the rule-of-thumb sizing at a glance:
| Goal | UV Power (rule of thumb) | Flow Rate | Best For |
|---|---|---|---|
| Clarify | ~8–10W per 1,000 gal | ~0.5x turnover/hour | Controlling green-water algae in ornamental and planted ponds |
| Sterilize | ~30W per 1,000 gal (40–50W for quarantine) | 1–1.5x turnover/hour | Pathogen/parasite control in koi systems and stressed-fish setups |
For clarification, the 8–10W per 1,000 gallons figure is the industry rule of thumb, but the actual effectiveness depends on flow rate, lamp type (low-pressure UV-C lamps are around 40% efficient, medium-pressure around 10%), and water temperature — low-pressure lamps work best between 68°F and 104°F. Always check the manufacturer's flow-rate spec for the unit you buy.
For sterilization, the 30W per 1,000 gallons figure is widely cited, but real-world effectiveness is determined by UV dose (mJ/cm²) and contact time. Sterilizers should be sized so pond water passes through the unit about 1–1.5 times per hour — the slower the flow, the higher the kill rate. For stressed fish or quarantine systems, 40–50W per 1,000 gallons is often recommended.
Other factors that drive algae growth
Algae will grow more aggressively if your pond:
- Has a heavy fish stock (fish waste loads the water with nitrates and phosphates that feed algae)
- Gets a lot of direct sunlight and warmth
One myth worth flagging: live aquatic plants don't feed algae — they compete with it for the same nutrients and are one of the best natural algae-control tools available. A heavily planted pond is usually less prone to green water, not more.
And a related point: don't reach for a sterilizer just because your pond is high-nutrient or sunny. Sterilizers run at much higher UV doses and slower flow rates, and they can kill the free-floating beneficial microorganisms that planted ponds rely on for biological balance. For most ornamental and planted ponds, a properly sized clarifier plus good filtration and some shade is the right answer. Sterilizers belong on koi systems where parasite and pathogen control is the priority.
Plan for annual bulb replacement
Whichever unit you pick, the bulb needs replacing roughly every 12 months. UV-C output drops sharply after about 9,000–12,000 hours of use, so a bulb can still glow visibly while no longer killing algae. Mark your installation date somewhere obvious so you don't get caught out by a bulb that looks fine but isn't actually clarifying anything anymore.
Where Should I Locate The UV Pond Light?
There are two placement decisions: where to physically mount the unit, and whether to position it before or after the mechanical filter in the plumbing loop.
Physical mounting
Keep the unit out of the water, close to the filter to keep pump runs short, and off the ground so it can't sit in a puddle. Rain exposure is fine — submersion is not.
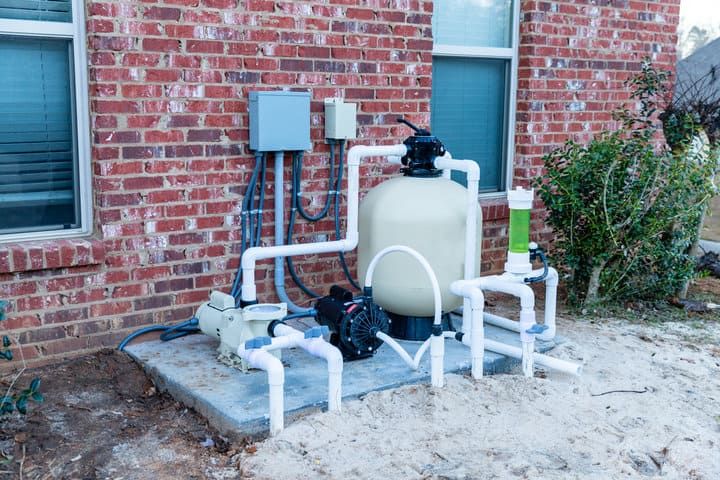
If your mechanical filter sits above water level, mounting the UV unit on top of it is usually the cleanest option. Otherwise, secure it to a fixed structure on the bank or drive a sturdy wooden stake into the ground and attach the unit to that.
Before or after the mechanical filter?
Most installers put the UV unit after the mechanical filter. The trade-offs:
| Placement | Pros | Cons |
|---|---|---|
| UV after filter (most common) | Water is already free of debris, so UV hits suspended algae rather than floating particles. Small rocks and hard debris are captured before they can crack the quartz sleeve. Less sludge means less frequent sleeve cleaning. | Dead algae and microorganisms pass straight back into the pond. On rocky pond bottoms, this dead matter can settle and feed future algae growth. |
| UV before filter | The mechanical filter captures dead algae and microorganisms killed by the UV, removing them from the system entirely. | Debris and grit can damage the quartz sleeve. The UV has to fight through suspended particles, reducing its effectiveness. More frequent sleeve cleaning required. |
On balance, UV-after-filter wins for most ponds — especially if you have a smooth pond bottom where dead matter is more likely to be drawn back into the filter on the next loop.
Flow Rate: The Most Common Sizing Mistake
UV effectiveness depends as much on contact time as it does on wattage. If the pump pushes water through the unit too fast, the algae and pathogens don't get a high enough UV dose, and the unit underperforms regardless of how many watts you bought.
Every UV unit has a manufacturer-specified maximum flow rate in gallons per hour (GPH). Check this before you plumb anything in. If your existing pump exceeds it, either fit a smaller bypass loop so only part of the flow passes through the UV, or step the pump down. A pump that's too powerful for your UV unit is one of the most common reasons people complain their UV light "isn't working".
As a rough guide: for clarification, aim for around 0.5x pond turnover per hour through the UV; for sterilization, aim for 1–1.5x turnover per hour.
Quartz Sleeve Maintenance
The bulb sits inside a clear quartz sleeve that separates it from the water flow. Over time, that sleeve picks up a film of mineral scale, biofilm, and algae residue — and even a thin coating can block a large fraction of the UV output. A dirty sleeve is one of the most common reasons UV units appear to fail.
Clean the sleeve at least every 2–3 months during the active season, more often if your water is hard or biofilm-heavy. The routine:
- Unplug the UV unit and switch off the pump.
- Disassemble the unit per the manufacturer's instructions and carefully remove the bulb and quartz sleeve, wearing clean gloves.
- Wipe the sleeve with a soft cloth. For mineral scale, soak it in a dilute white-vinegar solution, rinse with clean water, and dry with a lint-free cloth.
- Reassemble with clean gloves and check seals before turning the pump back on.
Seasonal Operation
In colder climates, most pond keepers switch off the UV unit over winter. Once water temperatures drop below around 50°F (10°C), algae growth slows dramatically and the UV unit is mostly burning bulb hours for no real benefit. Drain the housing if there's any chance of freezing, store the bulb somewhere dry, and restart the unit in spring as water warms back up. In milder climates, year-round operation is fine — just remember the running hours still count toward your annual bulb replacement.
Final Thoughts
Get the wattage and flow rate right, mount the unit after the mechanical filter in a dry GFCI-protected spot, and clean the sleeve every couple of months — and a UV light will hold pond water reliably clear. Most clarifiers show visible improvement within 1–2 weeks of switching on, so don't panic if the water still looks green the day after installation; give it a fortnight before you start second-guessing the setup.