
How To Wire Bathroom Fan And Light On Separate Switches?
Every late-night bathroom trip shouldn't mean waking the house with a roaring fan. The whole fix comes down to splitting one wire at the ceiling outlet box.
 Eugen
EugenEugen Nikolajev
Creator of LED Lighting Info
Hi, I am Eugen. I was always one of those kids who had all sorts of weird lighting gadgets for every occasion.
Now, I want to share my knowledge and experience about lighting with you on LED Lighting Info.
Read my editorial standards
Key Takeaways
To wire fan and the light separately, you'll add a second switch (or replace the single switch with a duplex), tap the existing hot to feed the new switch, and split the hot at the ceiling outlet box so each switch controls one device. Before touching any wires: shut off the breaker, verify the box is dead with a non-contact voltage tester, and check whether your jurisdiction requires a permit.
If your bathroom fan and light share a single switch, you're forced to run both whenever you want either one. Separating them saves energy, lets the fan vent steam without the lights blazing, and lets you use the bathroom at night without a roaring fan waking the household. In some jurisdictions, separate switching is actually required by the energy code.
⚠️ Safety first: Electrical work in bathrooms is a permitted trade in many US jurisdictions and across the UK (Part P regulations). If you can't confidently identify multiwire branch circuits at your panel, hire a licensed electrician — a service call costs less than a fire or a shock injury.
Should I Separate A Bath Fan From Light?
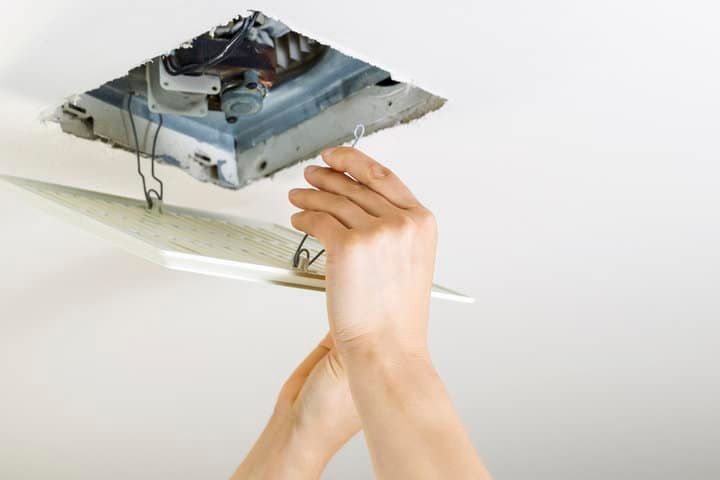
Fan-and-light pairs are usually wired to one switch because the original installer assumed both would always be needed at once. In practice, that's rarely true. The fan's job is to clear steam and humidity so mold doesn't establish; the light's job is to let you see. Tying them together means running one whenever you need the other — every shower, every visit, for years.
If your bathroom has a window, you'll often want the fan during a daytime shower without the light. At night, you may want the light without the fan disturbing a sleeping partner in an adjacent bedroom. On energy use, the maths is most favourable when the lights still use incandescents:
- Modern LED bulbs draw roughly 6–15 watts each, while older incandescent bulbs run 40–60 watts apiece. A multi-bulb vanity bar still on incandescents can easily exceed 200 watts total — that's where separating switches pays back fastest.
- Exhaust-only bath fans typically draw 5–50 watts; Energy Star–rated models hit ≥10 CFM per watt.
- Combination fan/light/heater units are a different beast — the heater element alone is usually 1,300–2,300 watts. Those units require their own dedicated circuit and are beyond the scope of this guide.
‼️In some jurisdictions — California most notably (Title 24 §150.0(k)) — separating the bath-fan switch from the lighting switch isn't optional. It's required by the energy code, with a narrow exception for fans controlled by a humidistat. Check your local code before assuming this is purely a preference.
At a glance, the trade-off between configurations looks like this:
| Separate Switches | Combined Switch |
|---|---|
| Run only what you need — save energy | One action controls both |
| Use fan without light during daytime | Lower risk of forgetting the fan |
| Quieter at night (fan off, light on) | Simpler wiring — lower install cost |
| More flexibility for large families | Fewer devices to maintain |
The biggest practical drawback of separate switches is that someone has to remember the fan. People naturally turn on the light when it's dark, but the fan is silent until used and easy to forget. It's worth bearing in mind before you commit — train yourself and your household to flip both before a shower.
Before You Start: Tools, Materials & Code
Tools
- Non-contact voltage tester (to verify circuits are dead)
- Multimeter (optional but useful for confirming continuity and polarity)
- Wire fish rods or fish tape
- Drill with paddle bits (for studs) and a drywall or hole saw
- Drywall saw or oscillating multi-tool
- Flathead and Phillips screwdrivers
- Wire strippers and lineman's pliers
Materials
- Cable that matches your existing circuit. Bathroom branch circuits in the US are typically 20-amp (NEC 210.11(C)(3)), which calls for 12 AWG / 12-2 NM-B (Romex). Use 14 AWG only if the existing circuit is on a 15-amp breaker — confirmed by reading the breaker. Always match the new wire gauge to the existing circuit.
- Double-gang switch box (or a single-gang if you're using a duplex switch in the existing opening)
- New single-pole switch (or a duplex switch — see the section below)
- Appropriately sized wire nuts and a matching cover plate
Code & permits
Most US jurisdictions require a permit and inspection for new switch circuits in a bathroom. In the UK, Part P regulations apply to bathroom electrical work. Don't skip this step — unpermitted electrical work can also affect home insurance claims later.
How To Wire A Bathroom Fan And Light Independently
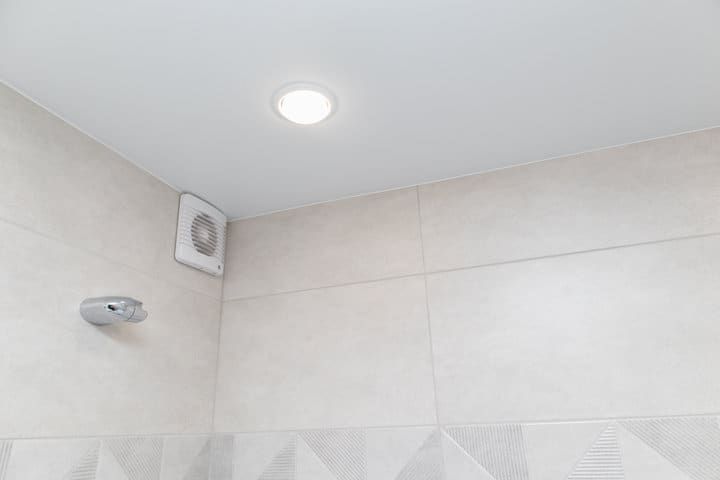
It helps to first picture the existing setup. A hot wire runs from the breaker panel to the bathroom switch — it'll be a standard interior switch installed outside the tub/shower zone (per NEC 404.4 and 680.70/72, switches must not be located within reach of someone in the tub or shower). A fully 'waterproof' switch is only needed in true wet-location applications. From the switch, a switch leg runs up to the ceiling outlet box where the fan and light are mounted. Inside that box, the hot is split with a wire nut so it feeds both devices simultaneously, while the neutrals and grounds are joined in their own wire nuts.
Your job is to break that shared hot connection so each device has its own switched hot — leaving neutrals and grounds in place — and to add a second switch.
Step 1: Shut off the breaker and verify
Find the breaker that feeds the bathroom and switch it off. Then confirm: tripping a breaker labeled 'bathroom' does not guarantee the box is de-energized — older panels frequently have mislabeled or shared circuits. Touch a non-contact voltage tester to every conductor in the box you'll be working in before disconnecting anything.
Step 2: Identify which wire feeds which device
At the existing switch, you need to know which load wire runs to the fan and which to the light. With the breaker still off, disconnect one of the load wires from the switch and cap it with a wire nut. Restore power, flip the switch — only the light or only the fan should respond. Shut the breaker back off, label both wires (this works for both the hot and neutral runs), and reconnect.
Step 3: Cut the new switch opening and feed it
Cut the opening for the second switch (or replace the existing single-gang with a double-gang box). Use wire fish rods to pull a length of cable through the wall from the existing switch box to the new opening. If the switches are close together, this is straightforward; if they're spaced apart, fishing takes patience but avoids tearing open the wall.
At the existing switch box, connect the incoming hot to a wire nut shared with the new switch's hot lead. Connect the neutrals and ground wires in the same way. The two switches now share a feed but will control independent loads.
Step 4: Run a new switch leg to the ceiling outlet box
Remove the fan and light fixtures so you can see into the ceiling outlet box. From the new switch, fish a new cable up the wall and across to that box. A second person makes this much easier — one to push the cable up the wall cavity using fish rods, one to pull it through at the ceiling.
Step 5: Split the hot at the ceiling outlet box
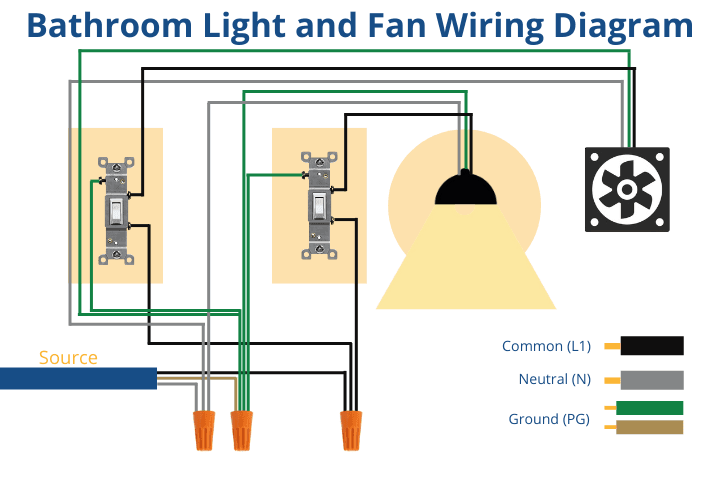
At the outlet box, undo the wire nut that currently joins the two device hots and the incoming switched hot. Connect the original switched hot to one device (say, the light) and the new switched hot from the second switch to the other (the fan). Leave the neutrals and grounds joined in their existing wire nuts — those don't need to be separated when both switches are fed from the same circuit.
⚠️ Important: this assumes both switches are fed from the same breaker. If you tap the second switch from a different breaker so the fan and light end up on different circuits but still share one neutral, you've created a multiwire branch circuit (MWBC). Per NEC 210.4(B), an MWBC requires a 2-pole common-trip breaker (or single-pole breakers with an identified handle tie) and the two hots must land on opposite phases — otherwise the shared neutral can be overloaded. If you aren't sure which case applies in your panel, stop and call a licensed electrician.
Step 6: Reinstall, restore power, and test
Reinstall the light fixture and the fan. Restore the breaker. Test each switch independently — the light switch should run only the light, the fan switch only the fan. If both come on together, the hot wasn't properly split at the ceiling outlet box; shut the breaker off and recheck the connections.
How To Wire A Double Switch For Fan And Light
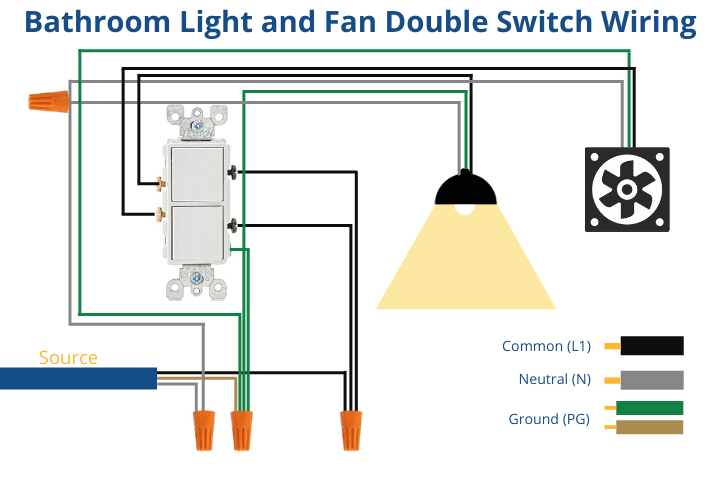
A double switch (also called a duplex switch) is two independent single-pole switches built onto a single yoke inside one device housing, controlling two separate loads from one wall plate. The two line-side terminals are usually joined by a small removable jumper tab so a single hot feed powers both halves; that tab is broken off only when each switch is fed from a different circuit.
The advantage over two side-by-side switches is purely practical: both controls fit in a single-gang opening, so you don't have to cut a second hole. You may need to enlarge the existing box opening slightly depending on the device dimensions.
Wire it like this: connect the incoming hot to one of the line-side terminals — the factory jumper tab feeds the other half of the switch — and run separate wires from each of the two brass load terminals back to the fan and light. Only break the jumper tab if you intend to feed each half of the switch from a different circuit (and revisit the MWBC warning above before you do).
Check the device's terminal markings before you wire — different manufacturers use different layouts, and reversing line and load will leave the switches non-functional. If you wire it incorrectly, the switches won't work.
Final Words
Wiring a bathroom fan and light onto separate switches is straightforward in principle: kill power, verify dead, split the hot at the ceiling outlet box, and add a second switch (or a duplex switch in the existing opening). The hardest part is fishing the new cable through finished walls without tearing them open.
If you're unsure which approach suits your setup — or whether your panel layout has put you in multiwire-branch-circuit territory — consult a qualified electrician before proceeding.